こんにちは、エンジニアのさもです。
前回に引き続き、MNISTに挑戦します。
今回は、隠れ層を1層追加して、単層のニューラルネットワークを構築していきます。
コードはこちらの書籍をお手本にしています。

TensorFlowで学ぶディープラーニング入門 ~畳み込みニューラルネットワーク徹底解説~
- 作者: 中井悦司
- 出版社/メーカー: マイナビ出版
- 発売日: 2016/09/27
- メディア: 単行本(ソフトカバー)
- この商品を含むブログ (1件) を見る
スポンサーリンク
目次
単層ニューラルネットワークの概要
前回は、入力値(画像)に対して、パラメータ行列
をかけて、バイアス
を足し、その結果をソフトマックス関数を用いて確率へ変換しました。入力値は、28×28サイズの画像を、長さ784の配列へ変換し、画像の枚数分束ねた、2次元配列になります。
こんなイメージです。

「None: 任意」と書いてあるのは、学習時に同時に入力する画像の枚数が可変なためです。
今回は、入力層と出力層の間に1つ層を増やします。
ちょっと見にくいですが、こんなイメージです。

上段で使っている関数が、SoftmaxからReLUという関数に代わり、上段の出力が、前回の作ったネットワークの入力になっています。
ReLUは、以下のような形の関数です。

実装
ReLU関数を用いることと、層が1層増えるだけなので、実装自体は、前回のコードを数行変えるだけです。
ライブラリのインポート
import tensorflow as tf
import numpy as np
import matplotlib.pyplot as plt
from tensorflow.examples.tutorials.mnist import input_data
%matplotlib inline

np.random.seed(20171001)
tf.set_random_seed(20171001)   # パラメータの初期値に必要
mnist = input_data.read_data_sets("./data/", one_hot=True)
変数の定義
hidden_size = 1024
with tf.name_scope('X'):
    x = tf.placeholder(tf.float32, [None, 784])
with tf.name_scope('W'):
    w1 = tf.Variable(tf.truncated_normal([784, hidden_size]))
with tf.name_scope('b1'):
    b1 = tf.Variable(tf.zeros([hidden_size]))
with tf.name_scope('Z'):
    z = tf.nn.relu(tf.matmul(x, w1) + b1)

with tf.name_scope('W'):
    w0 = tf.Variable(tf.zeros([hidden_size, 10]))
with tf.name_scope('b0'):
    b0 = tf.Variable(tf.zeros([10]))
with tf.name_scope('P'):
    p = tf.nn.softmax(tf.matmul(z, w0) + b0)

with tf.name_scope('T'):
    t = tf.placeholder(tf.float32, [None, 10])
前回と変数名は変わっていますが、zが隠れ層の出力になります。
w1の定義に、tf.truncated_normalを使っていますが、これがとても重要です。
はじめ、とりあえず0でいいかと思ってtf.zerosにしていたのですが、全く学習が上手くいきませんでした。
正解率などの定義から学習まで
with tf.name_scope('Loss'):
    loss = -tf.reduce_sum(t * tf.log(p))
with tf.name_scope('Train'):
    train_step = tf.train.AdamOptimizer().minimize(loss)
with tf.name_scope('Acc'):
    correct_prediction =  tf.equal(tf.argmax(p, 1), tf.argmax(t, 1))
    accuracy = tf.reduce_mean(tf.cast(correct_prediction, tf.float32))

sess = tf.InteractiveSession()


with tf.name_scope('summary'):
    tf.summary.scalar('accuracy', accuracy)
    tf.summary.scalar('loss', loss)
    merged = tf.summary.merge_all()
    writer = tf.summary.FileWriter('./logs', sess.graph)

sess.run(tf.global_variables_initializer())
i = 0
for _ in range(2000):
    batch_xs, batch_ts = mnist.train.next_batch(100)
    __, summary = sess.run([train_step, merged], feed_dict={x: batch_xs, t: batch_ts})

    if i % 100 == 0:
        loss_val, acc_val = sess.run([loss, accuracy], feed_dict = {x: batch_xs, t: batch_ts})
        writer.add_summary(summary, _)
        print("step: %d, loss: %f, acc: %f" % (i, loss_val, acc_val))
    i += 1
前回とほぼ変わらないので一気に書きました。
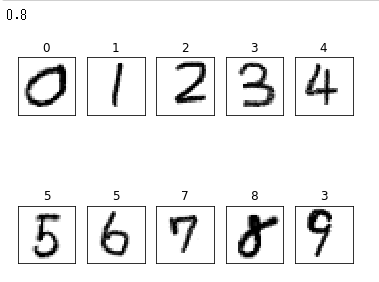
学習を実行すると、最終的に学習データ、テストデータでの正解率はともに97%になりました。
自分の手書き文字を判定する
from PIL import Image
import os
filenames = os.listdir('./sample/test_samples')
c = 1
fig = plt.figure(figsize=(6, 5))
labels = []
imgs = []
for name in filenames:
    img = Image.open("./sample/test_samples/" + name).convert('L')
    img.thumbnail((28, 28))
    img = np.array(img, dtype=np.float32)
    img = 1-np.array(img / 255)
    img = img.reshape(1, 784)
    imgs.append(img)
    label = np.array([0,0,0,0,0,0,0,0,0,0])
    label[c-1] = 1
    labels.append(label)
    test_p = sess.run(p, feed_dict={x: img})
    subplot = fig.add_subplot(2, 5, c)
    subplot.set_xticks([])
    subplot.set_yticks([])
    subplot.set_title('%d' % (np.argmax(test_p)))
    subplot.imshow(img.reshape((28, 28)), vmin=0, vmax = 1, cmap=plt.cm.gray_r, interpolation="nearest")
    c += 1
print(sess.run(accuracy, feed_dict={x: np.array(imgs).reshape((10, 784)), t: labels}))
こちらは全く前回と同じです。
結果は以下のようになりました。

正解率8割!前回より結構上がりました!
それでもmnistで用意されたテストデータほどの正解率にはならないですね。
最後に
隠れ層を一層だけ追加することにより、前回より表現力が増し、正解率が上がりました。
ほんのちょっとコードを追加しただけで予想以上正解率が上がりました。
学習時間は前回と比べるとそこそこかかりました。次回以降大丈夫かな・・・
次回は、いよいよ畳み込み層、プーリング層を追加して、畳み込みニューラルネットワークを作っていきます。
読者登録をしていただけると、ブログを続ける励みになりますので、よろしくお願いします。